WildPackets OmniPeek: Station Filtering
A Twitter follower asked a while back if I could use the blog to give some tips on using WildPackets OmniPeek. Seeing as how I'm always in need of interesting stuff to write about, I figured I'd give it a shot. Here, then, is a quick look at how to analyze station performance in OmniPeek.
There are a lot of metrics that can be used to analyze a station's performance. You might look at whether the station is using high or low rates. You could look at how much channel bandwidth the station is consuming. You should look at how many retransmitted frames are being sent and received by the station. All of these different ways to analyze a station's performance have one thing in common: you have to configure a filter on your sniffer that captures only your station's traffic.
The first step of creating such a filter in OmniPeek is to find out what channel your station is on. Start out by finding out your station's MAC address (for my laptop, it's 00:1f:5b:cc:3b:fd). Once you've got that, open OmniPeek and click "New Capture". You'll get the Capture Options window that looks like this:
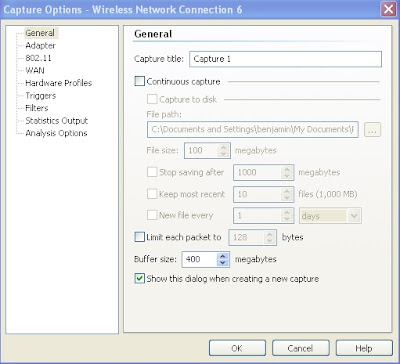
To find out what channel the station is on, go to that little "802.11" link on the left hand side of the capture window and select "Scan". The default setting for an OmniPeek channel scan includes channels 1, 6 and 11 in the 2.4 GHz band and everything in UNII-1 and UNII-3 of the 5 GHz band. Unless the person who configured your AP is a knucklehead, those should be the only channels you need to scan.
After you've configured OmniPeek to scan channels, your next step is to look at the list of APs and stations in the area. To do that, click OK to close the Capture Options window so that a Capture window opens up. Here's what a Capture window should look like:

Once the Capture window is open, you need to navigate to the WLAN screen to get a list of nearby APs and stations. If you look closely at the screenshot above, you'll see a "WLAN" link on the lower part of the left hand menu bar. You can click that link and then click the "Start Capture" button in the upper right hand corner of the Capture window. At that point OmniPeek will start capturing and you should be able to find your station by looking for its MAC address.
Once you find your station's MAC address in the WLAN screen, the next step is to name your station so that you can create a filter. To name your station just right-click on the station's MAC address and select "Insert Into Name Table". From there you can give your station a name, color and trust level like I did here:

After you've named your station, then you can create a filter that will capture only traffic going to or from your station. This part is a little bit tricky because by default OmniPeek assumes that any filter you create is going to be an AP filter. This is something that only started with OmniPeek 5, so those of you using older versions of the software will have an easier time creating the filter. To create the filter you right-click on the station you just named and select "Make Filter". That'll take you to the Insert Filter window. Be careful here. You'll want to look at the MAC address in the Insert Filter window because as I said above with newer versions of OmniPeek this screen is going to default to the AP's MAC address rather than the station's MAC address, just like mine did here:

See how the MAC addresses are different in those two screenshots? That's an annoying, ahem, feature in OmniPeek that I wish they'd change.
In any case, getting the station's MAC address in the filter is pretty simple. You just click on the box containing the MAC address of the AP and click "Delete". Then you click "And" and select "Address". That will give you the Address Filter window. From there you can click the right facing arrow to the right of Address 1 and select "Name Table". Once in the Name Table, you can just double-click on the station you just named and it'll be populated in the Address Filter window like this:

Once the MAC address of your station is in the Address Filter window, the hard part is finished. From here you click OK, type a name for your filter in the Insert Filter window and then click OK. Now you have a filter.
Now that you have a filter for your station, you're ready to troubleshoot. That start troubleshooting just head over to the Filters screen via the left-hand menu of the Capture window and check the check box beside the filter you just created. At that point OmniPeek will start capturing only frames that are sent or received by your station. If you then click the "Packets" link on the left-hand menu of the Capture window, you'll see all of your station's traffic just like this:

At this point, you're ready to look at statistics. I'm going to save the statistical analysis for another blog post. Hopefully creating filters for your devices will keep you busy enough for now.


This comment has been removed by the author.
ReplyDeleteHi,i read these post earlier and i have to say thank you is been very helpful.... i have been waiting for you to post the continuation (statistical analysis) i hope you will find time to to post it....once again thank you.Cheers
ReplyDelete"See how the MAC addresses are different in those two screenshots? That's an annoying, ahem, feature in OmniPeek that I wish they'd change."
ReplyDeleteBen, you're right, that *is* annoying, and definitely something we can change. Perhaps the proper behavior would be to automatically create an address (rather than BSSID) filter if you've clicked a station (rather than AP)?